What is write protection?
- Write Protection is a feature(yes you read it right) that is generally found in flash drives like pen drives and memory card. It prohibits users to write anything to the drive, thus protect the drive from any modification to its data and also stops virus(from computer) to Copy(write) itself to the drive.
Initially, it was done using a small physical (hard)switch located in the Pendrive and memory card. The small yellow switch in this snap is for write protection. Similar, switch is used in any side of some pendrives.
Now, this feature is also being achieved digitally without any Hardware.
Why is it a problem then?
-it is a Problem when:
a) we don't know about it and it prohibits us from writing
b) it is (digitally) implemented without user consent either by someone or by Virus
First of all, make sure if there is any physical Switch is present or not, if it is then adjust it to unlock side.
If there is no physical switch or still problem persists, Go ahead.
As many a times it is done by virus also, it is suggested to scan your system including pendrive with a good updated Antivirus, if you don't have any then Download and install MalwareBytes, update it and do the scan.
Method I : Using Diskpart
First we will try to remove read only attribute from the specific drive.
Warning : Be sure to do this on the right disk since the diskpart command can do serious damage if you run it on the wrong disk.
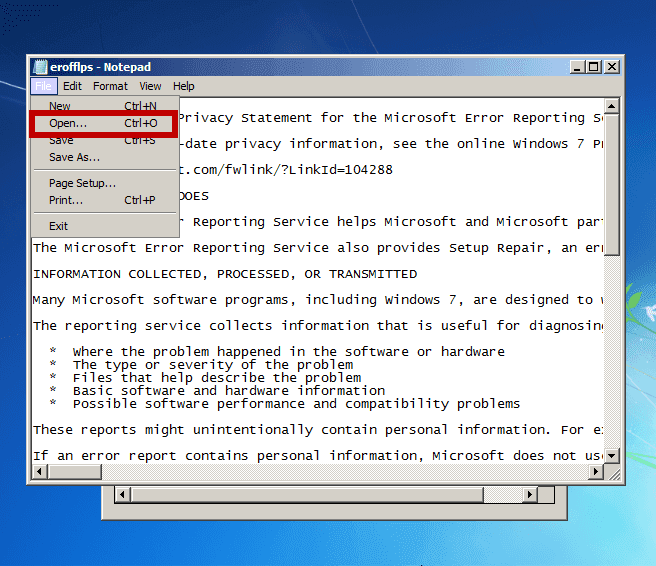
1) Start Menu -> Run(or in search box) -> Type 'cmd' -> press 'Enter' -> Command Promt will open
2) Type 'Diskpart' -> enter -> 'list disk' -> enter
3) Select the disk you are going to modify, if your required USB disk is in 'disk 4' then
4) type 'select disk 4' -> enter , now disk 4 is selected, 'list disk' will show star(*) beside it
5) 'list disk' -> enter
To Clear the Read-Only attribute on the selected disk (To Disable write protection):
6) Type 'attributes disk clear readonly' -> enter
The disk is no longer Write protected. The Read-Only attribute is removed.
If you wish to set the write protection again, just do the same procedure and
Type 'attributes disk set readonly' -> enter
When you are done modifying the disk attributes just issue the exit command
7) Type 'exit' -> enter
If files inside USB drive are still in read only mode
-open command prompt
-Type ' j: ' -> enter (put your drive label in place of 'j' )
- Type ' attrib -r /s /d *.* ' -> enter
- exit
Method II : Using RegEdit
This will Remove write protection from USB Drives. If it doesn't then lets disable writeprotect from your System Using Registry Editor:
1) Start Menu -> Run(or in search box) -> Type 'regedit' -> press 'Enter' -> Registry Editor will open
2) Expand by clicking ' + ' and Navigate to the following path :
HKEY_LOCAL_MACHINE\SYSTEM\CurrentControlSet\Control\StorageDevicePolicies
If you can't find 'StorageDevicePolicies', then you have to create the key:
-Right click on ' control '-> New -> Key -> a new key will get created -> rename it as 'StorageDevicePolicies'
-Right click on 'StorageDevicePolicies'
-> New -> DWORD (32-bit) Value -> Name it as 'WriteProtect'

Now if you want to enable write protection, use ' 3) ' , to Disable write protection, use ' 4) '
3)To Enable Write protect, Double click on 'WriteProtect', and set its value data to '1'
Once set, all users on the computer is now blocked and prevented from copying, transferring or writing any files, documents and data to the USB disk drives.

4)To Disable Write protect, Double click on 'WriteProtect', and set its value data to '0'
Once reset to '0', all users on the computer is now allowed to copy, transfer or write any file, document and data to the USB disk drives.
5)close your registry edit window.
For first time, you may get that same message again, close the notification window and try to write to the USB again and it should work. You’ll probably have to do this with all your USB drives to clear that “Disk is write protected” message. Hope this helped.
If still same problem then You have to go for Formatting it.
Method III : Using Formatting
Using 1st two is simple.
For using Apacer Formatting Utility,
Unzip this utility to preferably on a folder on desktop for easy access (Do Not Save it on pen drive).
Keep your pen drive plugged in
Double click on the 'Start.bat' file in the folder where you unzipped the above utility.
This will start formatting your pen drive, wait till the formatting completes and the LED on your pen drive stops blinking.
Remove your pen drive and plug it in again.
If you still face same problem, go to service center. If you have warranty left then replace your pendrive.
Happy Computing :)
- Write Protection is a feature(yes you read it right) that is generally found in flash drives like pen drives and memory card. It prohibits users to write anything to the drive, thus protect the drive from any modification to its data and also stops virus(from computer) to Copy(write) itself to the drive.
Initially, it was done using a small physical (hard)switch located in the Pendrive and memory card. The small yellow switch in this snap is for write protection. Similar, switch is used in any side of some pendrives.
Now, this feature is also being achieved digitally without any Hardware.
Why is it a problem then?
-it is a Problem when:
a) we don't know about it and it prohibits us from writing
b) it is (digitally) implemented without user consent either by someone or by Virus
Solution
First of all, make sure if there is any physical Switch is present or not, if it is then adjust it to unlock side.
If there is no physical switch or still problem persists, Go ahead.
As many a times it is done by virus also, it is suggested to scan your system including pendrive with a good updated Antivirus, if you don't have any then Download and install MalwareBytes, update it and do the scan.
Method I : Using Diskpart
First we will try to remove read only attribute from the specific drive.
Warning : Be sure to do this on the right disk since the diskpart command can do serious damage if you run it on the wrong disk.
1) Start Menu -> Run(or in search box) -> Type 'cmd' -> press 'Enter' -> Command Promt will open
2) Type 'Diskpart' -> enter -> 'list disk' -> enter
3) Select the disk you are going to modify, if your required USB disk is in 'disk 4' then
4) type 'select disk 4' -> enter , now disk 4 is selected, 'list disk' will show star(*) beside it
5) 'list disk' -> enter
To Clear the Read-Only attribute on the selected disk (To Disable write protection):
6) Type 'attributes disk clear readonly' -> enter
The disk is no longer Write protected. The Read-Only attribute is removed.
If you wish to set the write protection again, just do the same procedure and
Type 'attributes disk set readonly' -> enter
When you are done modifying the disk attributes just issue the exit command
7) Type 'exit' -> enter
If files inside USB drive are still in read only mode
-open command prompt
-Type ' j: ' -> enter (put your drive label in place of 'j' )
- Type ' attrib -r /s /d *.* ' -> enter
- exit
Method II : Using RegEdit
This will Remove write protection from USB Drives. If it doesn't then lets disable writeprotect from your System Using Registry Editor:
1) Start Menu -> Run(or in search box) -> Type 'regedit' -> press 'Enter' -> Registry Editor will open
2) Expand by clicking ' + ' and Navigate to the following path :
HKEY_LOCAL_MACHINE\SYSTEM\CurrentControlSet\Control\StorageDevicePolicies
If you can't find 'StorageDevicePolicies', then you have to create the key:
-Right click on ' control '-> New -> Key -> a new key will get created -> rename it as 'StorageDevicePolicies'
-Right click on 'StorageDevicePolicies'
-> New -> DWORD (32-bit) Value -> Name it as 'WriteProtect'

Now if you want to enable write protection, use ' 3) ' , to Disable write protection, use ' 4) '
3)To Enable Write protect, Double click on 'WriteProtect', and set its value data to '1'
Once set, all users on the computer is now blocked and prevented from copying, transferring or writing any files, documents and data to the USB disk drives.

4)To Disable Write protect, Double click on 'WriteProtect', and set its value data to '0'
Once reset to '0', all users on the computer is now allowed to copy, transfer or write any file, document and data to the USB disk drives.
5)close your registry edit window.
For first time, you may get that same message again, close the notification window and try to write to the USB again and it should work. You’ll probably have to do this with all your USB drives to clear that “Disk is write protected” message. Hope this helped.
If still same problem then You have to go for Formatting it.
Method III : Using Formatting
Using 1st two is simple.
For using Apacer Formatting Utility,
Unzip this utility to preferably on a folder on desktop for easy access (Do Not Save it on pen drive).
Keep your pen drive plugged in
Double click on the 'Start.bat' file in the folder where you unzipped the above utility.
This will start formatting your pen drive, wait till the formatting completes and the LED on your pen drive stops blinking.
Remove your pen drive and plug it in again.
If you still face same problem, go to service center. If you have warranty left then replace your pendrive.
Happy Computing :)